HTML template customization - templates/form.tpl.html
The "templates" directory contains the files that determine the layout of your page. You can use HTML and CSS to customize the layout as you wish.
If you are using a WYSIWYG editor like Dreamweaver, Frontpage or NetObjects, please make sure that the software does not make any changes by itself.
The "examples" subfolder contains additional HTML forms. You can use them as examples for creating your own forms. For example, the "alternative_form.tpl.html" template shows you how to let the visitor choose to recommend the page he has just visited, or the homepage. The "advanced_form.tpl.html" template contains examples of how to integrate checkboxes, radio buttons and select menus into your form.
The template files contain markers with { and } like: {txt_next_page}. These markers will be replaced by its counterparts from the language file "languages/language.en.inc.php". You are free to edit that file and change the words and phrases. You are also free to replace the markers within the template files with real words, or to put those markers in other positions within the template file. You can also enhance the language file by using the given pattern.
The following placeholder is not included in the language file and should not be changed.
 {message}
 {fields}
Include Files
The script allows you to include files directly into the HTML template files. It makes no difference whether you want to include PHP, HTML or other text files. For example:
<INCLUDE FILENAME="header.php">
The script automatically replaces this line with the content of the file "header.php". Please pay attention that relative paths (../ etc.) start at the main directory of the script (same level as the index.php file).
If you use absolute paths (path starts with slash), the path starts at the www root folder of your web account by default. For example:
 /logs/
 /images/
 /layout/
 /layout/header.php
 /form_mail/
 /form_mail/templates/
 /form_mail/templates/form.tpl.html
 /form_mail/index.php
Let us assume you want to include the file "header.php" into the file "form.tpl.html". If you use a relative path, you need to start at the same level as the file "index.php" is:
<INCLUDE FILENAME="../layout/header.php">
If you want to use an absolute path, you need to write your path starting at the www root folder:
<INCLUDE FILENAME="/layout/header.php">
You can find example files in the folder "templates/examples_includes/".
Form Fields
If there is an error, or a form field is left blank, the script will automatically enter a placeholder with the same name as the form field. That is to pre-fill the form fields so the user doesn't have to fill in all fields another time. For example:
<input type="text" name="lastname" value="{lastname}">
You can add more fields to a form or change the existing fields of a form. Please make sure that the field names and the placeholder names do not contain white spaces, or special characters. They may have underscores ("first_name") in them.
Multiple Recipients
The script allows you to send a recommendation e-mail to an arbitrary number of recipients. The simplest way would be to add the desired number of form fields - one for each recipient e-mail - to your form.
You can select any field name (only alphanumeric and underscore), but every field name must start with the word "multiple_" (note the underscore) and end with a consecutively number "_1" (note the underscore).
In the folder "templates/examples/" you can find an example form and mail template. The HTML template file "multiple_recipientes_form.tpl.html" has been prepared for sending the recommendation e-mail to multiple recipients. The folder also contains the e-mail template file "multiple_recipients_mail.tpl.txt".
Let us suppose you want to let your visitors send e-mails to up to four recipients. If we choose, for example, the name "recipient_email" as field name, our multiple field names would be following:
 multiple_recipient_email_1
 multiple_recipient_email_2
 multiple_recipient_email_ 3
 multiple_recipient_email_4
The complete form fields would look like this:
 <input type="text" name="multiple_recipient_email_1" value="{multiple_recipient_email_1}" />
 <input type="text" name="multiple_recipient_email_2" value="{multiple_recipient_email_2}" />
 <input type="text" name="multiple_recipient_email_3" value="{multiple_recipient_email_3}" />
 <input type="text" name="multiple_recipient_email_4" value="{multiple_recipient_email_4}" />
The field names - surrounded by curly brackets - are automatically the template variables for the field values (value="...").
The script allows you to assign an arbitrary number of additional form fields to every recipient. Every field that starts with "multiple_" will automatically assigned to the corresponding recipient, based on the trailing number.
  <input type="text" name="multiple_firstname_4" value="{multiple_firstname_4}" />
  <input type="text" name="multiple_lastname_4" value="{multiple_lastname_4}" />
  <input type="text" name="multiple_recipient_email_4" value="{multiple_recipient_email_4}" />
The script uses the same e-mail template file for every recipient. The template variables (those in curly brackets) have the same name as their corresponding fields in the form template. But you need to replace the trailing numbers with a question mark. The script recognizes those variables and replaces them with correct values. For example:
To: "{multiple_first_name_?} {multiple_last_name_?}" <{multiple_email_?}>
The script uses the same mail template file for all recipients. All non-multiple field values appear in every e-mail.
Mandatory Form Fields
Every form field can be marked as a mandatory field. This means that the form will not be submitted until these fields are filled in. Enter all the field names you want to be mandatory, in a hidden form field in the template. For example:
<input type="hidden" name="required_fields" value="lastname, email, subject" />
E-mail Syntax
Like the mandatory fields you can define fields that you want to be checked to make sure they have the correct e-mail syntax. Enter all the e-mail field names you want to be checked, in a hidden form field in the template. For example:
<input type="hidden" name="email_fields" value="email_1, email_2" />
Extended Error Messages
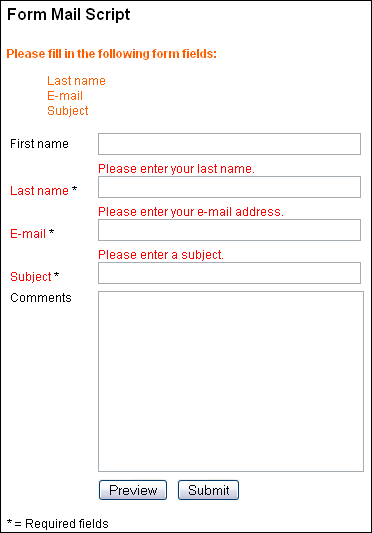
If a required field has not been filled out by a visitor an error message will be displayed above the form fields by default.
The script allows you to display error messages right beside, above or below a form field. Moreover, the script allows you to alter the appearance of the form label. Following screenshot shows an example:
Following three variables are available:
 {required:fieldname='Error message':endrequired}
 {syntax:fieldname='Error message':endsyntax}
 {error:fieldname='Default text'||='Error message':error}
{required:fieldname='Error message':endrequired}
Let us suppose you have a field "last_name" and you define it as required field. You can use following variable for the error message:
{required:last_name='Please enter your last name.':endrequired}
In case the visitor has not filled out the field, the variable will be replaced with the error message:
Please enter your last name.
You could format the error text using CSS:
{required:last_name='<span style="font-weight:bold;color:#FF0000;">Please enter your last name.</span>':endrequired}
The error text now appears in bold font and in red color:
Please enter your last name.
{syntax:fieldname='Error message':endsyntax}
Let us suppose you have a field "email" and you define it as e-mail syntax field. You can use following variable for the error message:
{syntax:email='Please enter a valid e-mail address.':endsyntax}
In case the visitor has not filled out the field correctly, the variable will be replaced with the error message:
Please enter a valid e-mail address.
You could format the error text using CSS:
{syntax:email='<span style="font-weight:bold;color:#FF0000;">Please enter a valid e-mail address.</span>':endsyntax}
The error text now appears in bold font and in red color:
Please enter a valid e-mail address.
{error:fieldname='Default text'||='Error message':enderror}
You can use following variable, if you want to change the appearance of the form field label. Let us suppose you have a field "subject " and you define it as required field. You can use following variable in order to change the appearance of the label:
{error:subject='Subject'||='<span style="color:#FF0000;">Subject</span>.':enderror}
Without an error the first part (everything before the two vertical lines - pipes) will be displayed. In case the visitor has not filled out the field, the variable will be replaced with the second part:
For a better understanding you could take a look at the example in the folder "templates/examples/".
Thank You Page
After the form has been submitted the user will be redirected to a page you can define in a hidden form field in the template. For example:
<input type="hidden" name="thanks" value="http://www.your-server.com/thanks.html" />
Please enter the whole URL including http:// and the domain name (i.e.: http://www.your-domain.com/).
If you don't define this field or leave it empty the script displays the data entered by the user.
Define HTML Template
If you are calling the script from an existing form in a HTML page, and do not want to use the default HTML file, you can define another HTML file in a hidden form field in the template. For example:
<input type="hidden" name="html_template" value="form.tpl.html" />
Define Mail Template
The mail template can be defined the same way. You can define a single mail template. For example:
<input type="hidden" name="mail_template" value="mail.tpl.txt" />
You can also define more than one mail template. Each of these templates can contain different recipients and contents. For example:
<input type="hidden" name="mail_template" value="mail.tpl.txt, mail2.tpl.txt" />
Select Menus
The script can process select menus like the following:
 <select name="" size="">
   <option value=""></option>
   <option value=""></option>
 </select>
An exception is multiple select menus.
How to make sure the value selected by the user appears after a new load of the form shows the following example:
 <select name="Salutation" size="2">
   <option value="Mr" {select:Salutation=Mr}>Mr</option>
   <option value="Ms" {select:Salutation=Ms}>Ms</option>
 </select>
The placeholder {select:Salutation=Ms} contains of the following elements. In the first position is the type of form field you are using. In this case it is a select menu (= select). After that follows a colon ( : ). In the second position is the name of the form field. In the example above that is "Salutation". After that follows an equal sign (=). At the last position is the value of the option tag (value="").
To make the selected value appear within the mail template, you need to enter the name surrounded by curly brackets { } in the mail template.
{select:Salutation}
In case a user did not select one of the options the script removes the placeholder from the mail template.
Checkboxes
The script can process checkbox fields like the following:
<input type="checkbox" name=" " value="" />
You can make sure the value selected by the user will appear after a new load of the form. For example:
<input type="checkbox" name="Newsletter" value="Yes" {checkbox:Newsletter=Yes} />
The placeholder {checkbox:Newsletter=Yes} contains of the following elements. In the first position is the type of form field you are using. In this case it is a checkbox field (= checkbox). After that follows a colon ( : ). In the second position is the name of the form field. In the example above that is "Newsletter." After that follows an equal sign (=). In the last position is the value of the option tag (value="").
To make the selected value appear within the mail template, you need to enter the name surrounded by curly brackets {checkbox:} in the mail template. For example:
{checkbox:Newsletter}
In case a user did not select the checkbox the script removes the placeholder from the mail template.
Radio Buttons
The script can process radio button fields like the following:
<input type="radio" name=" " value="" />
You can make sure the value selected by the user appears after a new load of the form. For example:
<input type="radio" name="Salutation" value="Mr" {radiobutton:Salutation=Ms} />
The placeholder {radiobutton:Salutation=Ms} contains of the following elements. In the first position is the type of form field you are using. In this case it is a radio button field (= radiobutton). After that follows a colon ( : ). In the second position is the name of the form field. In the example above that is"Salutation". After that follows an equal sign (=). In the last position is the value of the option tag (value="").
To make the selected value appear within the mail template, you need to enter the name surrounded by curly brackets - {radiobutton:} - in the mail template. For example:
{radiobutton:Salutation}
In case a user did not select any of the radio buttons the script removes the placeholder from the mail template.
You can find examples of the above described features in the template "advanced_form.tpl.html".